
Thank you for purchasing the Singular Motorsports Hood Louver System!
This kit is a DIY product. The below instructions are guidelines only. You should choose tools which you are familiar and adept with for the installation process. Always wear safety eye wear, hearing protection, and gloves. We are not responsible for damage to your vehicle or this product during the installation process or after. We always recommend a professional installation for our products.
Your hood louver kit comes with the following:
- Hood Louver set
- 3/16th Rivets
- Rubber trim
- Cut/drill template decal
Tools you will need:
- Cutting tool of choice – we prefer an angle grinder with 4.5″ metal cutting disc
- Tool to round the corners of the cuts – we like a small drum sanding attachment for an air grinder
- Rivet Gun
- Scissors
- Painter’s tape
- Measuring tape
- Drill & 7/32″ drill bit
Some great installation videos provided by customers:
Notes for Getting started
The vinyl cut template decal has been rolled up for shipping. Unroll the template and set it on a smooth, flat surface. Run a flat edge such as a credit card over the top of the decal to ensure that the transfer layer on top is adhered evenly to the decal below before removing the backing material to apply it.
This entire process can be done either with the hood attached to the car or with it removed. Both have their pros and cons – having the hood off of the car allows you to work around it much easier, but it is awkwardly large and can be difficult to hold in place without scratching it, especially while cutting. Leaving the hood attached to the car keeps it solidly in place for the cutting, but you must thoroughly protect you engine bay from the debris that is created while cutting, and cutting the underside of the hood with it on the car requires some flexibility and up-side down maneuvering.
The Louvers – Bending
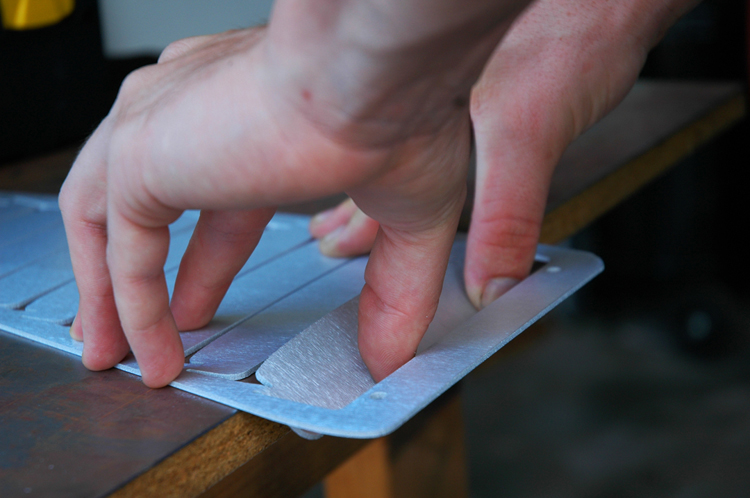
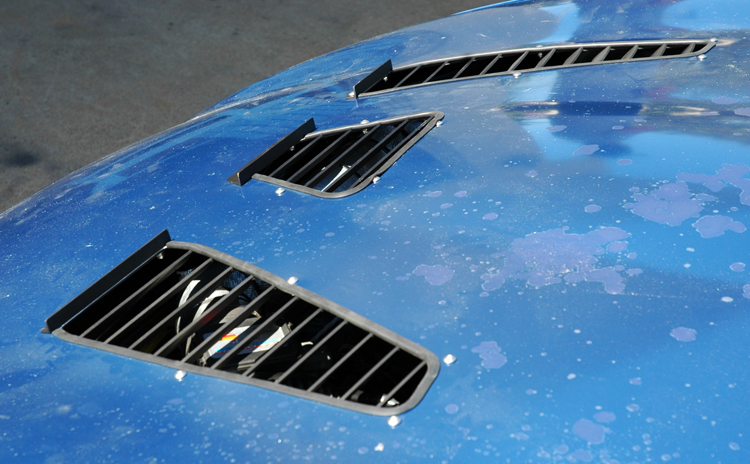
To bend the louvers into position, use a table top that has a hard, sharp edge. Place the louver fin which you want to bend above the table edge so that the edge of the table is centered underneath the bridge between the louver fin and the outer ring. Place your fingers on the rest of the louvers and outer ring that are sitting on the table, and place your thumbs on the fin which you will bend. Press down with a firm, smooth pressure until you have bent the fin to roughly 45 degrees.
Version 2 louvers feature the gurney flap integrated into the louvers. Bend the forward most flap 90 degrees so it points vertical. Bend the remaining fins behind this to the normal 45 degrees.
You can adjust individual fins slightly after bending so that they all match, but do not bend the fin back and forth as this will weaken the metal and break the connection between the fin and the outer ring.
The Louvers – Finishing
There are many different finishes which you can apply to the louvers. Our favorites are either powder-coating or good ol’ fashioned rustoleum spray cans. If you are spray painting, be sure to use a primer first. If you wish to leave them bare for the aluminum look, it is important to clearcoat them to keep the aluminum from corroding.
TIP: If you are going with a transparent finish (anodizing or clear coating), never handle the louvers with your bare hands. Always use gloves, otherwise you will get fingerprints on the bare aluminum which will show through in the end result.
Version 2 louvers now ship anodized black from the factory. You may still paint or powdercoat the louvers over the anodize. Simply clean the surface and spray!
The template
The cut template is one large decal. Before applying it, leave the backing on and set it on your hood and measure the alignment. The template is specific to each generation of miata so you should have the appropriate one that corresponds to your car. Measure from the front edge of the hood at its center, back towards the windshield.
Position the template’s front edge back from the front/center point of the hood by the following amount:
- NA (1990-1997): 9.5 inches
- NB (2000-2005): 12.5 inches
- NC (2006-2014): 8.0 inches
- For installing NC louvers in NB hood: 12.0 inches **no modification of template necessary**
With the front/rear positioning established, now center the template left/right on the hood using a tape measure to check the template’s relationship to the sides of the hood.
Once you are satisfied with the position on the hood, use small strips of painter’s tape to mark the positions of the corners of the decal. This will help you align the template as you apply it.
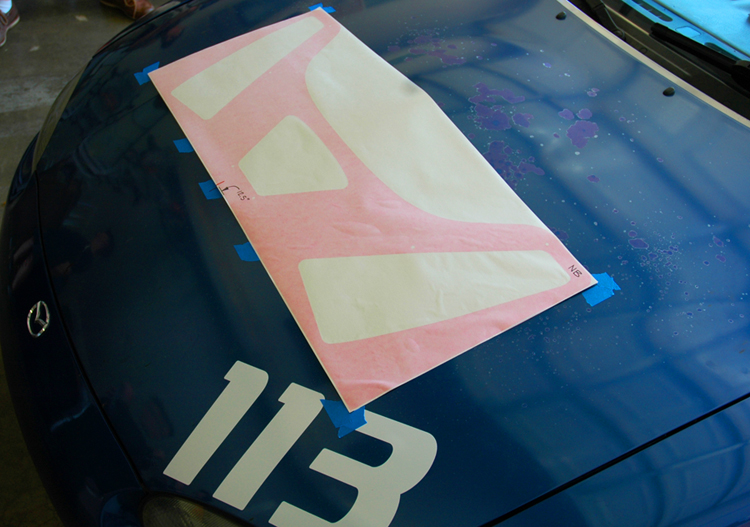
Here is the NB template positioned on the hood with its alignment marked with painter’s tape:
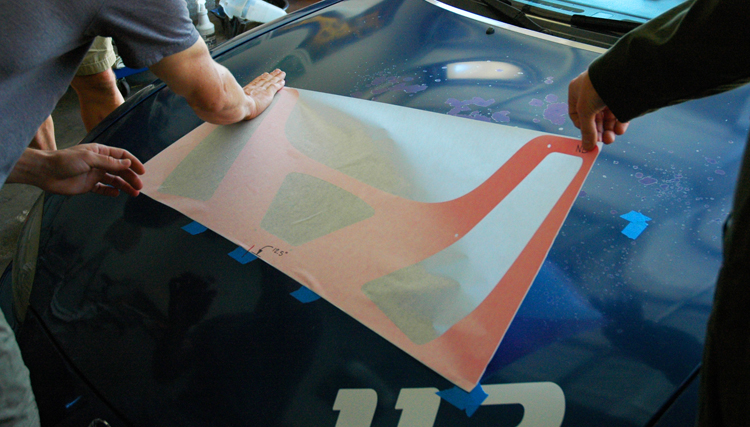
With your positioning marked, remove the backing from the decal and apply it to the hood. This is only a temporary template, so air bubbles are OK, but it is very important to apply it evenly without kinks or wrinkles as these would affect the shapes of the holes.
Having an extra set of hands is very useful for this step:
Once applied, remove the top transfer layer.
Cutting the holes
Using your cutting method of preference, first cut the holes in the top layer of the hood according to the template.
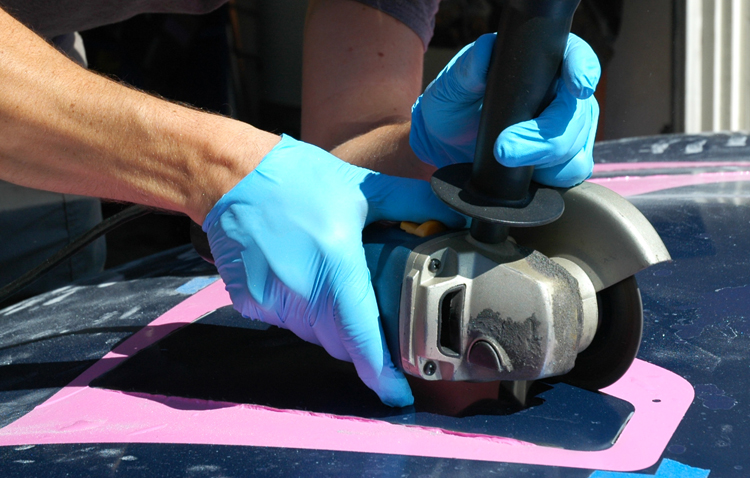
Our preferred tool for the large portion of cutting is an angle grinder:
IMPORTANT: The widths for your holes varies according to your desired end result. If you do not want to use the included rubber trim and instead wish to paint your cut edges, then cut the holes exactly according to the template. If you do want to use the included trim, you must cut the holes 1/16“ wider on each side (to make the hole 1/8″ wider overall) than the template to allow clearance between the trim and the louver fins.
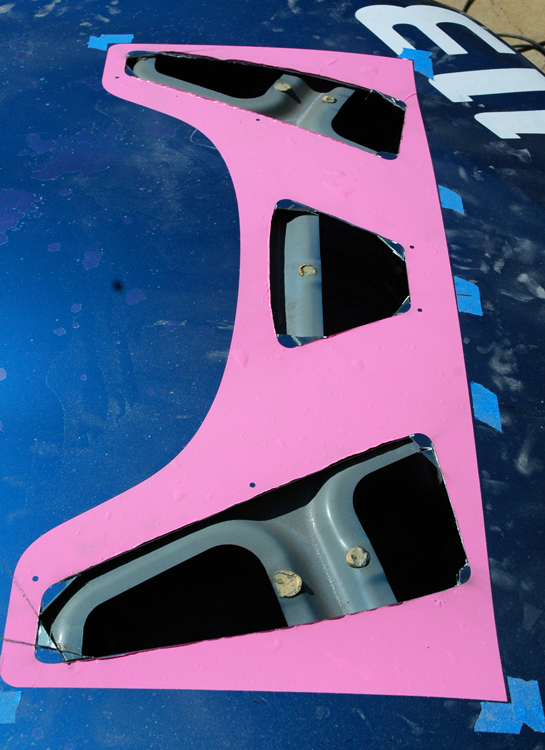
Here the holes are cut out of the hood, note how the corners of the holes have not been cut out yet:
Cutting the bracing
With the top hole cut, you can move to the underside of the hood.
Looking at the underside, you can now see where the holes are in the top layer. You need to remove the bracing around the holes, ideally at least one inch outwards of the hole edges.
IMPORTANT: The key to not sacrificing hood rigidity is to retain at least part of the main A frame bracing that runs from the back corners of the hood to the front center area by the hood latch. Your louver’s design and placement is such that you only need to remove half of the width of this bracing. Use a sharpie or similar to mark where you need to cut.
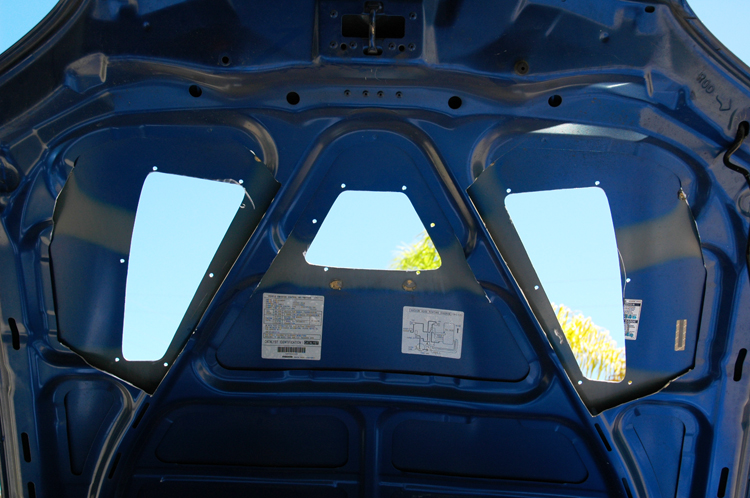
Here is the underside of the NB hood with the bracing cut (and with holes drilled, but we’ll get to that in the next step), followed by the same picture with red lines showing where the actual cuts were made:

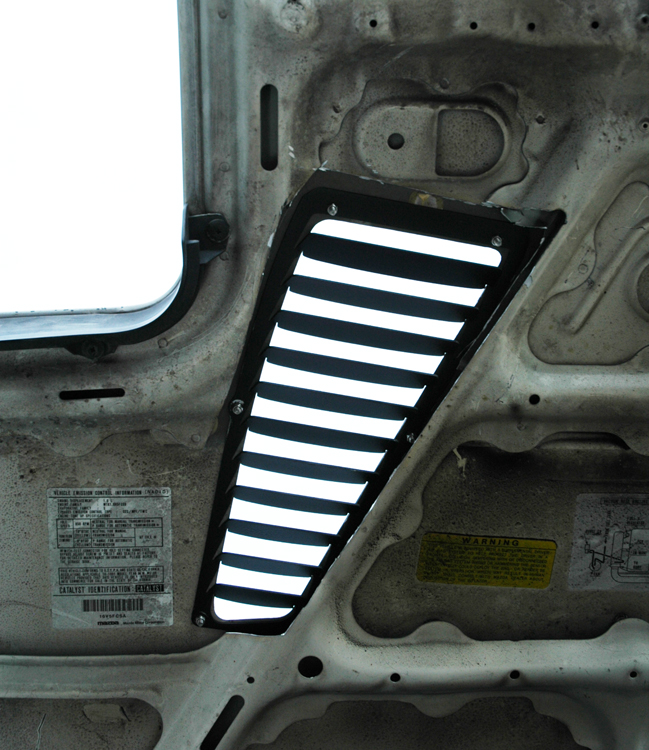
Here is the underside of the NA hood (with louver already installed) showing the differences in where to cut:

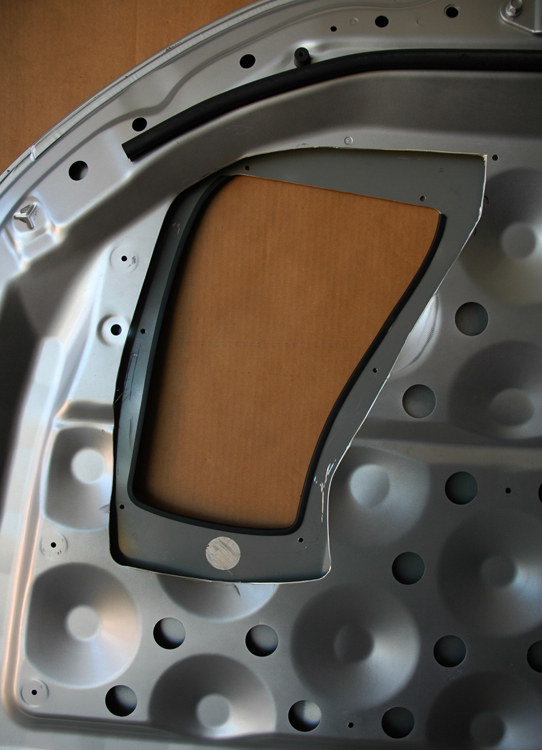
Here is the underside of the NC hood showing the area cut away:
NA TIP: Note that the NA hood has an additional third center layer in the front section, so some additional work must be done to cut through this layer as well on that generation of miata.
NC TIP: The top and bottom layer of the NC hood are attached in more areas than those of earlier years. We recommend that you cut both the top and underside and then remove both pieces at once, still attached together.
USE CAUTION: Be careful with the depth of your cut when cutting the underbracing – some of the bracing sits very close to the top layer of the hood. You do not want to accidentally cut into the top layer of the hood.
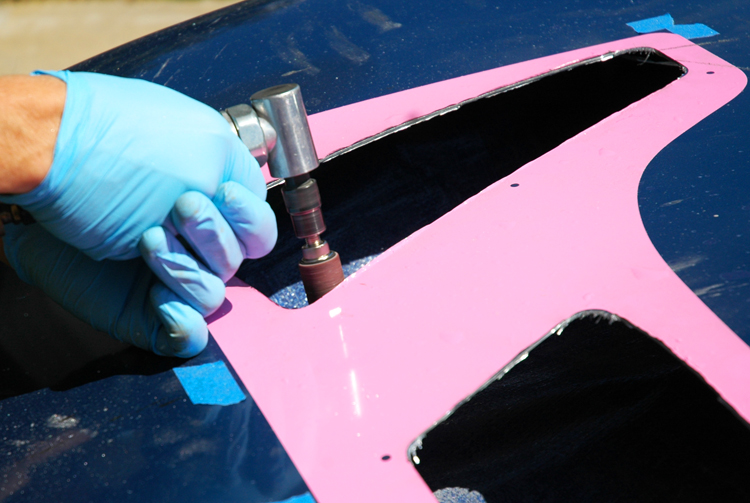
Finishing the corners
Once the bracing has been removed, it is time to finish the rounded corners of the holes.
TIP: The method we like to use for the rounded corners is to first cut all the long straight sections, but stop short of the corners. Then cut diagonally to connect the straight sections and remove the large center piece cut from the hood. With this out of the way, you can work your way into the corner with your cutting tool much easier, and then once you are nearly to the edge of the template’s corner, use a sanding drum with an air grinder or dremel to get a nice and even round corner.
Finishing the corners with a sanding drum on an air grinder:
Drilling the mounting holes
Going back to the top of the hood, you will see that each hole in the hood template has two corresponding bolt holes. Drill these holes to 7/32″, first using a smaller drill bit for a pilot hole to ensure that your hole is centered in the template’s hole.
After each two holes are drilled, fit your louvers into the hole from the underside and install bolts/nuts through the two holes you drilled (You can leave the washers out for this step). Tighten those two bolts down and then, using the louver as a template for the rest of the bolt holes, use a sharpie or similar to mark the locations where you need to drill.
Remove the louvers and then drill the remaining holes from the underside of the hood.
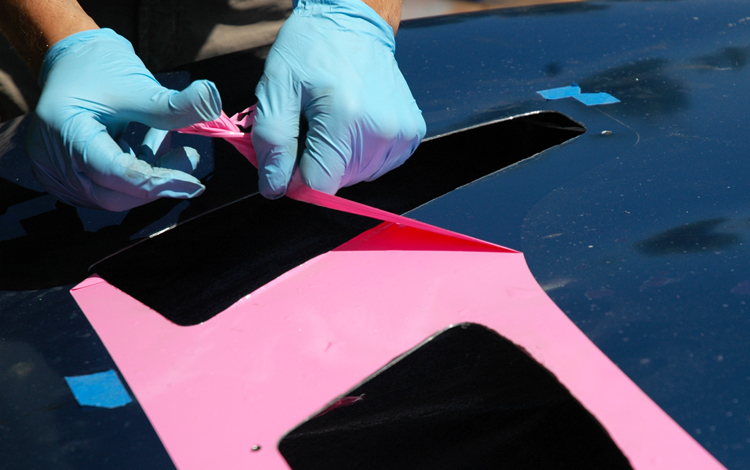
Removing the template
It is now time to remove the vinyl template. Peel the vinyl up at a corner and then remove from the hood. Keep in mind that the paint may have separated from the hood near the freshly cut edges. To minimize the chances of removing paint along with the vinyl, peel the template inwards towards the center of the cut holes.
With the template removed, you may wish to clean up the cut edge, particularly if you intend to not use the rubber trim. There are plenty of power/air tools which can accomplish this, but simple sand paper can accomplish the same result well.
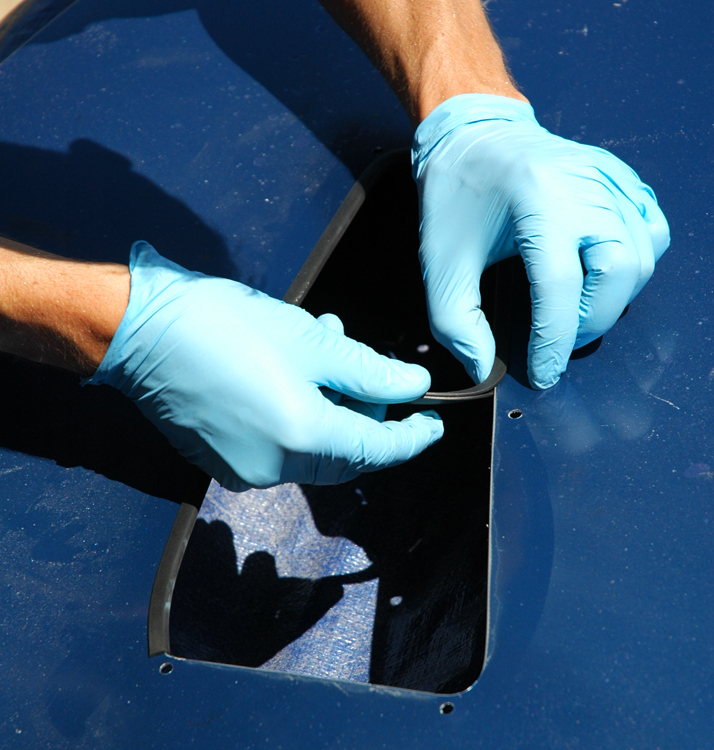
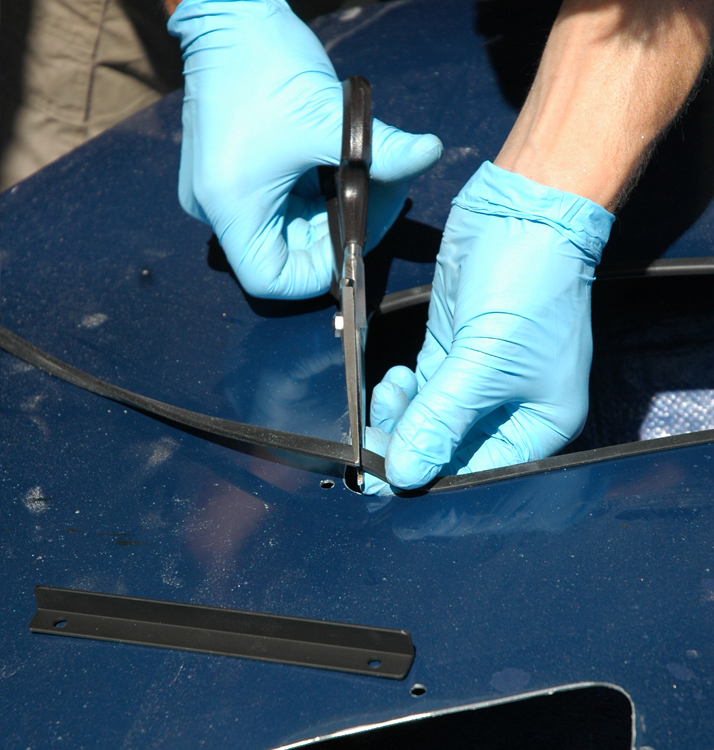
Installing the rubber trim
Your louver kit comes with over 8 feet of rubber trim (more than you need) to clean up the edges that you cut. This trim can be cut with a simple set of sharp scissors. Run the trim around three edges of your cut hole, leaving the front edge of each cut uncovered – (the gurney flap will cover the front edge) and then cut the trim to length.
Installation
Now the exciting part! Install the louvers in the underside of the hood using the supplied hardware.
Version 1 louvers use a nut and bolt. Use one washer per bolt, placed between the nut and the louver. We highly recommend using a tiny dab of anti-seize on each bolt. Tighten the nuts slowly, as nylock nuts can overheat the bolt threads if rushed.
Version 1 kits include gurney flaps separate from the louvers. The gurney flaps mount in-line with the two forward bolts, and should be oriented with the “L” shape facing towards the front of the car. See photos below for an example.
Version 2 louvers use rivets instead of nuts, bolts and washers. If you are note familiar with using a rivet gun, take care to keep the rivet flush on the hood surface as you install the rivet. A second set of hands can be helpful to keep the hood louver firmly against the hood while installing.

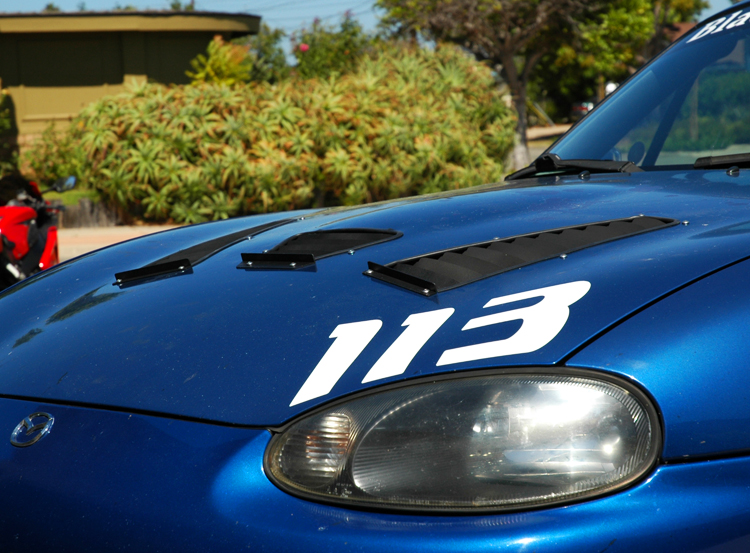
And you’re all finished! Thank you for purchasing our hood louver kit and enjoy years of superior cooling!
If you have any questions, reach out to us at support@singularmotorsports.com
Just installed the full louver from Ryan. Install was tricky ( two or more people is a requirement) but when done couldn’t be any more happier. If you are not a diy type of person leave this to the professionals to be installed. Thanks Ryan and singular motorsports for an awesome set of diy louvers that has function written all over it.
Install isn’t very tricky, just very time consuming to get a good result. One person will have no problem doing this if they pay attention to what they are doing. I had no problem with any of the steps by myself.
If you are having a hard time getting the tiny washers and nuts on the bolts started, pinch the washer and nuts between two fingers(stacked on top of each other), insert your 3mm allen into the bolt, and turn the bolt, rather than the nut so you don’t run the risk of dropping the washer/nut(very hard to find on the garage floor).
Using a christmas tree bit, or stepper bit, makes drilling the corners very easy.
Getting ready to start this project…
If you use the step bit – I assume you cut your corners first?
I like the idea…
Hey John, that’s correct – if you’re going to do the rounded corners with a step bit in a drill, you want to do that before ‘connecting the dots’ between each of those holes with your straight cuts.
NB 2001 Miata
I spent all day May 2nd 2015 prepping & painting the louvers. Which is the easy part.
The thing I found to be most difficult and I feel its needed to have two people is attaching the vinyl template. Plus having no wind greatly helps. If I had to do this again, I would have never stuck the vinyl to the car.
Overall it took me including paint time about 11 hours to fully complete. It would have been faster if I didn’t decide to use my Dremel and just use my air compressor with angle cutter, which I did switch too half way, then use the Dremel to cut the finer details.
Now after install I went for a test drive and they out performed my expectations.
Hi Sean,
Yes two people is recommended for applying the vinyl decal portion to ensure alignment is perfect. Installation takes time and attention to detail but is worth it for end results. Glad to hear the performance exceeded your expectations!
On the NA is there a change of water damage during rain? Can’t quite tell if the vents are above important bits
Hi Michael,
Nothing to be concerned about with these vents. We’ve designed them to avoid being above the engine’s valve cover itself, and all of the auxilary electrical connectors under the hood are weather-sealed. Keep in mind that water gets into your engine bay every time you drive in the rain via the bumper mouth and through the radiator.
When cutting through the center support layer on my NA, I slid a piece of the cutout hood between that layer and the remaining hood for an added margin of error. Got into that piece a couple of times so I was glad it was there.
Hi,
I have the RX8 version of this product i think.
What is the spacing for the template on the RX8 from the front edge of the bonnet?
Thanks
Matt
Hi Matt, 11.5″ from the front of the RX8 hood to the front of the vinyl template.
Completed an install yesterday, as it is with all products we sell at Weekend-Racer.com we (or our racing friends) test the products so we can guarantee the product is worth the price and works as intended. The install went great, even though I got confused with the integrated Gurney…. It turned out great and I’m looking fwd to the next event to see the performance results. Great product Guys!!!
Should i bend the fins before i powdercoat or after is fine too
Hey Jesse,
You want to bend the fins prior to powdercoating, as the powdercoat would crack if you bent them afterwards.
Best thing to do is bend the fins and do the whole install including using the louvers as your templates for drilling the holes, etc. but don’t yet rivet the louvers into place in the hood. Once the hood is cut and drilled, then send the louvers off to get powdercoated. This way once they are powdercoated you only need to rivet them right in, you don’t have a long install process ahead of you where you risk scratching up the nice finish.
in the video the installer is using a heat gun while bending the louvers. The written instructions make no mention of that. what is the preferred method and how hot if heat gun is used?
Thanks
Hey David! Heat gun will help make the metal a bit easier to bend, our recommended method is using a table or work bench as described in the instructions.
I installed my louvers today and didn’t have nearly enough rubber to go around all 3 louvers. Only enough for 2 , 1/2. I looked through the whole box and couldn’t find any more. Is there any way I could be sent more or a good store to find some ?
Hey Taylor. We can send you some additional trim if you email us. We include enough trim to cover all of the louver cut except the front where the forward most fin is bent at a 90* angle to act as the gurney flap.
I appreciate you sharing this awesome page. It’s definitely helped me.
If you’re putting the vinyl on without any help, mark the centerline of the template, and make centerline marks on the hood as well. Then peel/tear away the backing at the center of the template only. This lets you get the center of the template adhered to the hood in the right position before you expose the adhesive anywhere else on the template.
Done this way, one person can easily get the template installed without any problems.
Just finished. You can do it single handed – even removing/installing the hood – it weighs nothing. I had a hard time bending the fins even with a heat gun so I hit them with my purse. A can of NAPA color matched paint is like $50 now, btw.
Is there a way I could get another template for an NA hood? I am transferring my vents to a new one.
Hi Brian,
We do sell replacement templates! Juts shoot us an email to get the ball rolling. sales@singularmotorsports.com